It is made from five different timbers - Hardwood Plywood (WMP) and Redwood Pine for construction with a Cerejeira veneer, Lime wood for the carving and Sapele for the frame.
Lime wood is also known as Bass wood or Linden wood.
 |
| Finished headboard |
Stage 1 - Veneering
Firstly I tacked the central panel of the headboard. It's made from a Cerejeira Teardrop Veneer on a Hardwood plywood and Redwood Pine substrate. From what I researched, Cerejeira is a Portuguese cherry tree. The Veneer had to be flatten first due to the teardrop cut. Not an easy veneer for a rookie like myself. It wasn't far from a burl veneer, in that it was difficult to get totally flat, due to the irregularity of the grain direction.
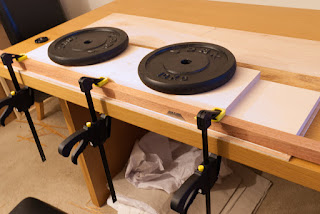
For this I used the press technique, as I had no access to any vacuum presses. Veneer softener was sprayed onto the fragile raw veneer and placed between two weighted flat sheets of plywood and paper. It was left for a couple of days until it was completely dry.
 |
| Veneer flattening attempt 1 - not enough weight |
 |
| Veneer flattening attempt 2 - more weight added |
 |
| Trimming veneer |
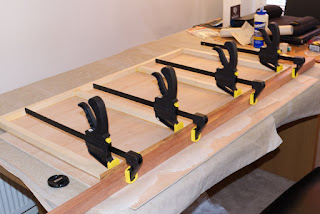
The PVA wood glue was rolled onto the plywood substrate and the veneer placed on top. Again the piece was weighted down until firmly stuck and any overlap trimmed off. After fully drying the surface was checked for any lumps that didn't glue down. These where cut along the grain with a blade and glue was injected using a syringe, and a weight was reapplied to that area.
 |
| Gluing the Veneer onto face of the Plywood panel |
Thinner cuts of the softened veneer were used for the lipping on the sides of the panel.
 |
| Gluing the lipping onto the sides |
Stage 2 - Carving
I chose to use the late viking Urnes style for the carving, based on this wonderful carved door.
Design:
A sketch for the design of the carving was done in Affinity Photo, as it allowed for easy adjustments and placement of reference points. Afterwards it was sliced into A4 sections for edge-less printing.
Carving:
All carving was done by hand with Henry Taylor carving chisels and a Morakniv, except on the last last two panels. A mini router was used for the first stage to reduce the amount of work, which it didn't time wise, as the router took several passes to remove that much material. But it did save the hands from any more blistering :)
1) The depth material was removed first.
2) Then the overlapping areas were carved too the required heights and the large basic shapes were also carved.
3) The final details were then carved.
The fourth frame of the GIF shows the final finish, obviously wasn't done until very near the end ;)
Also the area of joints were not carved until after the panels were fixed together with six wooded dowels. This allowed for a seamless transition between the panels.
 |
| The carved Lime wood panels completed |
 |
| Close up 1 |
 |
| Close up 2 |
Above are two closeup images of the carvings to illustrate the level of detail achieved.
Carved panel assembly:
Unfortunately and unavoidably, the thin, but wide Lime wood timber cupped and bowed a little. The affected panels had to be planed to remove any deformation and the sides re-squared before they could be assembled. Below was my solution too not having a bench vice to hold the timber for planing. Four F clamps and two blocks of timber were used as an ad-hoc a bench vice.
 |
| Ad-hoc bench vice |
The 3 panels were then glued together using six wooden dowels.
Staining and sealing:
The carving was then sealed with two coats of different varnish/turps mix.
The first coat being a more fluid 3:2 (60% varnish and 40% turps) making sure the wood absorb a lot of the mixture. I let it dry for 24 hours before a light sanding.
The next more viscous coat was 4:1 (80% varnish and 20% turps) again drying for 24 hours.
A mixture of artist oil paints was applied, coating the whole carving. It was let dry and then I started the arduous task of scrubbing and applying paint stripper to wear down the paint in a natural looking way.
I'll be honest, this was the most painful part, but was worth it for the natural ageing look. Any other method I tried look too fake or Disney'esque. Too seal the oil paint, three coats of beeswax was applied.
Stage 3 - Runes (Younger Futhark)
I felt that the central veneer panel was too plain compared to the carvings, so I decided to put Runes around border to help soften the transition between details.
For authenticity, the Runes were translated from English into Old Norse, and then written using the 'long branch' (Danish) version of the Younger Futhark alphabet.
The Younger Futhark was the alphabet used during the Viking age, containing only 16 runes. It evolved from the more aesthetically popular Elder Futhark alphabet (2-8th centuries) which was Proto-Norse, so came before the Viking Age (8th-12th centuries). It has 24 runes making it slightly easier for translation.
The Medieval Runes (12th-16th centuries) a 27 rune alphabet, later evolving from the Younger Futhark at the end of the Viking age.
Although the 2 top below images the runes are written in the later Medieval Runes, chosen for aesthetic reasons. These were rewritten back into the more authentic Younger Futhark Runes before carving.
 |
| Written on masking tape to gauge the spacing between runes. The Runes were written directly onto the Veneer for carving. |
 |
| Showing Medieval Runes, later rewritten into Younger Futhark Runes |
 |
| A mini router was used to cut the long straight lines either side of the hand-carved runes |
 |
| Extreme close-up of carved Runes |
Stage 4 - Gilding
Later I decided further the theme the headboard by dedicating it to the main Viking healer goddess named 'EIR' onto the center of the veneer panel, as this sort of linked to the meaning of the surrounding Runes.
The Runes were gilded using a high grade copper leaf gilding sheets, as copper was the metal associated with healing and with the goddess 'EIR' by the Vikings.
The Runes were filled with wood filler to smooth out the roughness of the wood grain and for a better ground for the gilding to adhere too. I chose not to use a bole, due to the amount of detail in the Runes, instead opting for faster drying PVA based glue since I wasn't going to be able too burnish at that small detail anyhow.
Once the gilding was cured, all panels were sealed with 2-3 coats of beeswax. Which did dull the metallic of the copper a little, but not by much. Too much sheen and the copper could look like gold leaf, so the beeswax worked out for the better :)
Stage 4 - Construction and Framing
The frame is made from Sapele hard wood. The top two corners were mitered and the bottom ones butt jointed as according to the style of of viking door construction.
I use the router too cut a trench along the frame that I would later gild with copper.
 |
| Pine dowel to support screw fixing |
A dowel had to be inserted into the back of the frame at the bottom to allow a screw to gain purchase in the end grain (illustrated above).
 |
| FRONT - W.1415 mm x H.799 mm x D.30 mm |
 |
| BACK, showing headboard construction. |
The frame was attached with recessed brackets, that were screwed onto the plywood back. .
Finish:
 |
| close-up detailing the copper edge trench of the frame |
The trench was gilded using a copper metallic paint. The paint worked better than the copper leaf as it produced a more smoother finish. If I wanted to use the copper leaf I'd have to use bole and burnish it using a agate stone tool, which I didn't have. I'm pretty happy with the metallic paint though.
The frame was then finished with an oil/wax based varnish as it brought out the colour of the Sapele timber better than beeswax would of.
Two heavy duty picture brackets have to be added yet, that will attached the headboard directly to the wall
All in all, a really fun project to do, well... apart from removing the oil paint on the carving part :)


